 |
| Visual Studio Code Setup Instruction |
Here's a step-by-step tutorial to set up Visual Studio Code for C and C++ programming on Windows and Mac.
On Windows (Manual):
Download and install Visual Studio Code: You can download the latest version of Visual Studio Code from the official website (https://code.visualstudio.com/download). Install the software following the instructions on the screen.
 |
| Download VS Code |
I personally prefer going for a 64-bit installation. After, downloading VS Code Simply install it to your system. Open VS Code and Install the most important extensions as below.
Install the C/C+ extension: Open Visual Studio Code, click on the
| Extention Icon VS Code |
 |
| C/C++ Extention Installation |
Install the extension and reload Visual Studio Code.
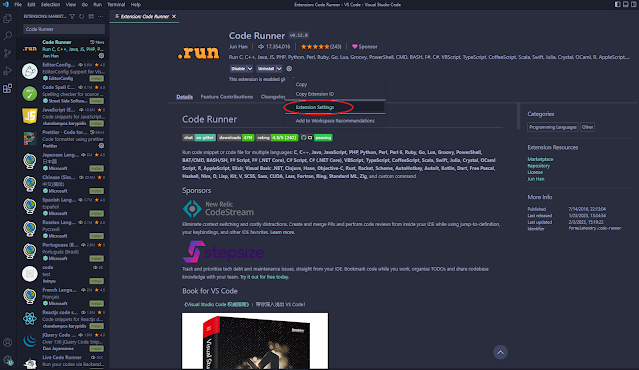
Install Code Runner extension: Again search for the extension named "Code Runner"
 |
| Code Runner ext. Setting |
 |
| Code Runner terminal setting |
"@ext:formulahendry.code-runner"Install GCC compiler: To compile and run C and C++ programs, you need to install a compiler. GCC (GNU Compiler Collection) is a free and open-source compiler that can be used on both Windows and Mac. I recommend you download (MinGW - Minimalist GNU for Windows).
After downloading "MinGW - Minimalist GNU for Windows" Run the Program as Administrator
 |
| Step-1: MinGW Installation Screen |
.webp) |
| Step-2: MinGW Installation Path |
.webp) |
| Step-3: MinGW Installation Completion |
.webp) |
| Step-4: MinGW Package Installation |
 |
| Step-5: This PC |
.png) |
| Step-6: Default Menus |
 |
| Step-7: Advanced System Settings |
 |
| Step-8: Environment Variables |
 |
| Step-9: System Variable Paths |
 |
| Step-10: Edit Environment Variable |
 |
| Step-11: Local Disk (C:) |
 |
| Step-12: MinGW Path |
 |
| Step-13: MinGW Bin Path (1) |
Step forward to the bin folder
 |
| Step-14: MinGW Bin Path (2) |
You will see all kinds of bin files in this folder. Now copy the path.
 |
| Step-15: MinGW Bin Path (3) |
 |
| Step-16: Edit Environment Variable |
Now go back to the Edit environment variable and click the New option top of the menu.
 |
| Step-17: Add New Path |
C:\MinGW\bin |
| Step-18: Click OK |
 |
| Step-19: Click OK |
 |
| Step-20: Click OK |
After clicking OK. Now simply restart your PC.
 |
| Step-21: Restart the PC |
Skip the #OnWindows step below if you've already installed "MinGW - Minimalist GNU for Windows" successfully.
On Windows:
If you counter any error with the "MinGW - Minimalist GNU for Windows" compiler then go through the other version of the MinGW compiler installation steps below.
Download MinGW-w64 from Package Manager or MSYS2.
MinGW: Choose the x86_64-posix-seh architecture and install the software.
or
MSYS2: Download the installer: msys2-x86_64-20230127.exe
Add MinGW to your PATH environment variable.
On Mac:
Install Xcode from the App Store.
Open Terminal and type xcode-select --install.
Configure Visual Studio Code for C/C++ programming:
Open Visual Studio Code and click on the File menu.
Click on the Preferences option, then Settings.
In the search bar, type "C++".
In the C++: Environment section, add the path to your GCC compiler.
On Windows: "C:/Program Files (x86)/mingw-w64/x86_64-8.1.0-posix-seh-rt_v6-rev0/mingw64/bin"
On Mac: "/usr/bin"
Create a new C/C++ file:
Click on the File menu, then New File.
Save the file with a .cpp or .c extension.
Compile and run C/C++ programs:
To compile the code, press Ctrl + Shift + B (Windows) or Cmd + Shift + B (Mac).
To run the code, press F5 and choose the "C++ (GCC) [default]" option.
That's it! You're ready to start coding in C and C++ with Visual Studio Code. 👨💻
